Wednesday, October 23, 2013

Cleaver East - Review

Cleaver East is a joint venture between Michelin-starred chefs: Oliver Dunne (from Bon Appetit) and Rory Carville (former head chef in the Locks Brasserie).  The restaurant opened its doors only a few months ago but already sparked so much controversy. It seems that people either love it or hate it and of course there is the whole battle between Lucinda O'Sullivan and Oliver Dunne. You can read about this here and here.

I was dying to try the restaurant and be able to judge for myself, so we booked a table for Sunday evening. Mr PB and myself, we like small-sized dishes and often opt for the tasting menu or order just a couple of starters each, so we were excited about the "small plates" concept and were looking forward to our meal.
Upon our arrival we were shown to our table and our waitress explained to us that Cleaver East is a tasting plate restaurant and advised to choose 3/4 dishes per person to share. The menu looked good, I would have liked to try most of the dishes on it.

I went for the St Tola Goats Cheese Parfait.


The dish looked and tasted absolutely divine (and this is coming from a person that doesn't like goats cheese!). Silky smooth goats cheese parfait, served with delicious beetroot and lovely crunchy walnut praline. This dish was a definite winner!

I also ordered the Scotch Egg, mainly because I've read so many good reviews about this dish and I was not disappointed. Lovely soft-boiled quail egg, smoked haddock, bit unusual but oh so delicious!


My partner ordered the Lobster Dumplings served with oriental mushrooms and lemongrass broth. He declared the dish tasty but not memorable.


The last two plates to arrive were Pan Fried Scallops with Crispy Pancetta and Potato Bubbles - very good, beautifully cooked scallops


and Cushion of Venison with Braised Red Cabbage and Wild Mushrooms. Unfortunately the venison was a bit tough, also Mr PB was convinced that he was served beef instead of venison, as he found the meat not very "gamey". I've tried a bit of the red cabbage and it was very good.


We decided to go for 2 desserts. I ordered the Lemon Cannelloni with Raspberry Curd and Raspberry Sorbet. It was yummy, very light and refreshing but I felt like there was something missing, a little biscuit would have made the dish perfect.


Mr PB went for the Cleaver East Twisted Banoffee, which was (as you can guess) a deconstructed banoffee pie. It was declared very good (I didn't even get to try any of it!!)


So, what did we think of the restaurant? The food was very nicely presented, some dishes were very good, some average but there was nothing we didn't like. The portions were quite big and in my opinion reasonably priced (from 6 to 14 per plate). Before visiting Cleaver East I've read comments of people saying that the portions sizes were very small and they left the restaurant feeling hungry and I was actually surprised when the first dishes arrived as I didn't expect for them to be so big. Five savoury, two sweet plates and three glasses of French Sauvignon Blanc between the two of us left us feeling just nice. We liked the "small plates" concept but we both agreed that it would be better if the dishes were served one at a time. Some of the dishes we ordered were excellent but served together with other plates the flavours just didn't work.
The staff were friendly but seemed very disorganized. We were asked several times by 3 different waiters to place our order after we have already ordered, to make it even more comical we were asked if we were ready to order by the girl that took our order a few minutes before!!! I could also hear people at other tables complaining about being served the wrong plates. The service definitely needs to improve!

Will we back? Yes, the food is good and we still want to try the other dishes on the menu. Hopefully by then the negative bits will be ironed out.

Cleaver East
The Clarence Hotel,
East Essex Street,
Temple Bar,
Dublin 2
www.cleavereast.ie

Friday, October 18, 2013

Pizza night...

Mmmm, nothing beats a home-made pizza on a rainy Friday evening!!


Mr PB finally delivered on his promise and made a pizza for me. It was definitely worth the wait! Perfect thin crust with a nice bit of crunch, lovely tomato sauce made from fresh ripe tomatoes with lots of garlic and all my favourite toppings: mozzarella, red onions, mushrooms, chorizo, salami and my very, very favourite jalapeno peppers. Yum!!!


The pizza was delicious and as you can see it's all gone now and the only thing that remains is a lovely taste in my mouth. I think we should start a new tradition in our home and have these "Pizza Fridays" on a regular basis.
P.S. No recipe today, the pizza dough and tomato sauce are Mr PB's secret....

Sunday, October 13, 2013

Choco-coco muffins


This post is especially for Kasia - my brother's girlfriend. I've made these muffins while I was spending some time with my family in Germany and Kasia said that they were the best muffins she has ever tasted.


Making these muffins is very easy and it takes only about 40 minutes from start to finish! Easy, quick and delicious with lovely bits of white chocolate, that's what I'm talking about! Yummy!!

Chocolate Coconut Muffins


(makes 12 muffins)

Ingredients:

200 g flour
8 Tbsp desiccated coconut
2 tsp baking powder
2 Tbsp cocoa powder
2 eggs
130 g sugar 
pinch of salt
100 g butter (melted and slightly cooled)
200 ml coconut milk
100 g white chocolate (chopped into small pieces)

Method:

Preheat oven to 180 degrees/ 160 degrees fan.
Line muffin tray with paper muffin cases
Sieve the flour, baking powder and cocoa powder into a large bowl, add the desiccated coconut and mix all the dry ingredients. In another bowl beat the eggs with sugar, add the coconut milk and cooled butter, mix it. 
Add the wet ingredients into your dry ingredients, mix it gently until combined.
Finally, add the white chocolate chips and gently fold them in.
Fill muffin cases and bake in the middle of the oven for 25 minutes or until a toothpick inserted into the centre comes out clean.


So, Kasia, I hope you'll enjoy the muffins and hope to see you both very soon in Dublin!


Saturday, October 12, 2013

Our favourite brownie recipe


There are two types of brownie lovers, these that like their brownies well-risen, light and fluffy and these that like their brownies to be heavy, fudgy and intensely chocolatey. We definitely fall in to the second category, I mean - I'm not too bad, I love my sweets and I enjoy any type of cake but since I have tried this recipe Mr PB does not want me to make brownies any other way.
Yesterday when I suggested that this weekend I will make brownies with dulce de leche swirl for a change, the response I got was: "No way, he wants HIS brownies and that there is no need to try new recipes as these brownies are perfect!"
OK, so here it comes, the recipe for possibly the best brownies in the world!! The brownies are delicious, moist with lovely delicate crust. Adding a pinch of salt helps to really bring out the intense chocolate flavour. No cocoa powder is used in these beauties, we're talking real chocolate and plenty of it!!!


Double Chocolate Brownies

Ingredients:
115g unsalted butter, plus more for greasing
60g dark chocolate (70% cocoa solids)
1 cup sugar
2 eggs, beaten
1/2 tsp vanilla extract
1/2 cup dark chocolate chopped into small chips
1/4 cup flour
1/4 tsp salt

Method:
Heat oven to 165 degrees. Grease an 20x20 brownie tin with butter. Line the tin with parchment paper, grease the paper. Set aside.
Melt the butter and the chocolate together in a medium size saucepan over low heat, stirring constantly with a wooden spoon. Remove the pan from heat and stir in the sugar. Add the eggs and vanilla and stir to make a smooth batter. Add the chocolate chips, flour, and salt, stir until incorporated. Pour the batter into the baking pan and spread evenly. Bake for about 40 minutes or until a toothpick inserted into the centre comes out clean. Enjoy the brownie with softly whipped cream, warm with a scoop of vanilla ice-cream or as a part of a trio of chocolate desserts as we did.


Sunday, September 29, 2013

Absolutely amazing pork belly!

Pork belly is definitely one of my favourite dishes. It is a relatively inexpensive cut of meat, easy to prepare and so full of flavour.  I have tried lots of different recipes over the years but today I would like to share with you one of my favourites: a very impressive looking Crisp cider-braised pork belly. I found this recipe a few years ago in BBC Good Food magazine.


The best thing about this recipe is that it is totally stress-free. You can have the meat ready a day or two before and all you have to do is fry the pork and reheat the sauce, prepare some vegetables and voilà! dinner is ready! The advantage of frying the pork just before serving is that you end up with lovely crispy skin and tender meat every time.


Crisp cider-braised pork belly

Serves 4

Ingredients:
1 large carrot, roughly chopped
1 onion, roughly chopped
few celery sticks, roughly chopped
2 garlic cloves, smashed
2 sprigs fresh thyme
2 bay leaves
500ml cider
small splash cider vinegar
1 litre chicken stock
750g unscored, boneless pork belly
2 tbsp sunflower oil

Day 1:
Heat oven to 180C/ 160C fan. Place all the ingredients except the pork and sunflower oil in a flameproof pan that will fit the pork snugly – a casserole dish is ideal. Season, bring everything to the boil then turn down the heat and slide the pork into the pan. The pork should be totally submerged – if it isn't top up with water. Cover the dish with a lid and place it in the oven for 3 hours undisturbed.
When the pork is cooked, leave it to cool slightly in the stock. Line a flat baking tray with cling film. Carefully lift the pork into the tray and make sure you get rid of any bits of vegetables or herbs as they will end up pressed into the pork. Cover the pork with another sheet of cling film and cover with a flat tray or dish – the tray must be completely flat as any indentations will be pressed into the pork. Weigh the pork down with another dish or some cans and leave to cool in the fridge overnight. Strain the juices into a jug or small saucepan, cover and chill.

Day 2: 
Unwrap the pork and place on a board. Trim the uneven edges so that you have a neat sheet of meat. Cut the meat into 4 equal pieces and set aside until ready to cook. Lift off any bits of fat from the braising juices and tip what will now be jelly into a saucepan, then bubble down by about two-thirds until starting to become slightly syrupy. Add a few more drops of vinegar to taste.
Heat the oil in a large frying pan until hot, then turn the heat down. Add the pork to the pan, skin-side down – be careful as it has a tendency to spit. Sizzle the pork as you would bacon for 5 mins until the skin is crisp. Flip it over and cook for 3-4 mins until browned. 

I like it served with mashed potatoes, Savoy cabbage, caramelized apples and drizzle of the cider sauce.


Saturday, September 28, 2013

Last few months...

It has been a long time since my last post. There has been a lot going on in my life lately and I just didn't feel like blogging...but now everything seems to be (more or less) back to normal and I'm back in the Blogosphere!

Here is a short summary of the last few months (in pictures).

My little niece was staying with us for 5 weeks during the summer holidays. We did some sightseeing around Dublin:


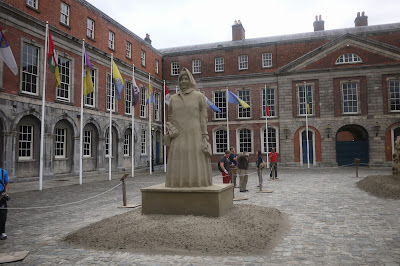
Dublin Castle Sand Sculpture Exhibition


Short trip to beautiful Northern Ireland:


and...loads of good food


Last week we went to see Roger Waters "The Wall" at The Aviva Stadium in Dublin. The show was simply amazing, the visuals and sound were just stunning! I can't stop listening to Pink Floyd now!!


That's it for now and starting from tomorrow back to proper food blogging. I'll be posting a recipe for the best pork belly ever. Don't miss it!!